Docker安装Nginx教程实现图例讲解
这里来安装下Nginx试下。
注意要明确一点,镜像是类,容器是对象。
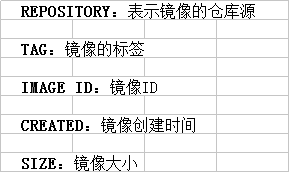
查看当前的镜像

看到只有一个测试的镜像。
拉取镜像:
下载成功后查看,镜像已经被下载下来了:

使用 nginx 镜像
运行容器:
查看容器运行情况:

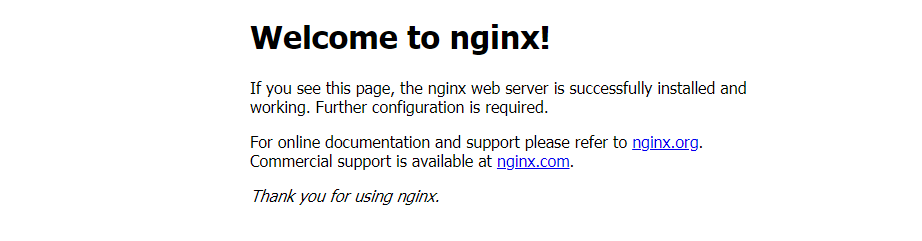
然后在浏览器输入网址:
修改文件:
[root@VM_0_4_centos bin]# docker ps
CONTAINER ID    IMAGE        COMMAND         CREATED       STATUS       PORTS        NAMES

8bf811453641    nginx        "nginx -g 'daemon of…"  4 minutes ago    Up 4 minutes    0.0.0.0:80->80/tcp  nginx_test
记住这里的 CONTAINER ID ,这是容器的ID
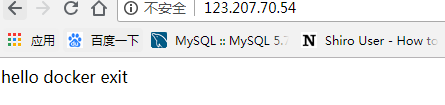
进入容器,修改:
[root@VM_0_4_centos bin]# docker exec -it 8bf811453641 /bin/bash
root@8bf811453641:/# cd /usr/share/nginx/html
root@8bf811453641:/usr/share/nginx/html# echo "hello docker">index.html
root@8bf811453641:/usr/share/nginx/html# exit
这是查看,修改的已经生效了。
如果想停止容器:
docker stop containerId // containerId 是容器的ID
[root@VM_0_4_centos bin]# docker stop 8bf811453641
然后用docker ps 看容器运行状态就行。
到此,容器运行完毕,总体来说非常的简单。
下面追加挂载方法先创建目录
mkdir -p /data/nginx/{conf,conf.d,html,logs}
nginx配置文件
/data/nginx/conf/nginx.conf
user nginx;
worker_processes 1;
error_log /var/log/nginx/error.log warn;
pid    /var/run/nginx.pid;

events {
  worker_connections 1024;
}

http {
  include    /etc/nginx/mime.types;
  default_type application/octet-stream;
  log_format main '$remote_addr - $remote_user [$time_local] "$request" '
           '$status $body_bytes_sent "$http_referer" '
           '"$http_user_age
/data/nginx/conf.d/default.conf
server {
  listen    80;
  server_name localhost;

  #charset koi8-r;
  #access_log /var/log/nginx/log/host.access.log main;

  location / {
    #root  /data/nginx/html;
    root  /usr/share/nginx/html;
    index index.html index.htm;
    #autoindex on;
    #try_files $uri /index/index/page.html;
    #try_files $uri /index/map/page.html;
  }

  #error_page 404       /404.html;

  # redirect server error pages to the static page /50x.html
  #
  error_page  500 502 503 504 /50x.html;
  location = /50x.html {
    root  /usr/share/nginx/html;
  }

  # proxy the PHP scripts to Apache listening on 127.0.0.1:80
  #
  #location ~ \.php$ {
  #  proxy_pass  http://127.0.0.1;
  #}

  # pass the PHP scripts to FastCGI server listening on 127.0.0.1:9000
  #
  #location ~ \.php$ {
  #  root      html;
  #  fastcgi_pass  127.0.0.1:9000;
  #  fastcgi_index index.php;
  #  fastcgi_param SCRIPT_FILENAME /scripts$fastcgi_script_name;
  #  include    fastcgi_params;
  #}

  # deny access to .htaccess files, if Apache's document root
  # concurs with nginx's one
  #
  #location ~ /\.ht {
  #  deny all;
  #}
}
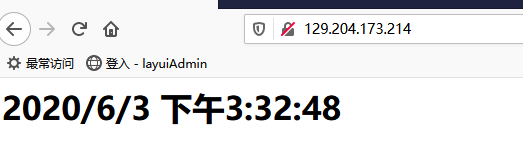
/data/nginx/html/index.html
<html>
<head>
  <meta http-equiv="Content-Type" content="text/html; charset=utf-8"/>
  <title>系统时间</title>
</head>
<body>
<h1 id="datetime">
  <script>
    setInterval("document.getElementById('datetime').innerHTML=new Date().toLocaleString();", 1000);
  </script>
</h1>
</body>
删除容器
docker rm -f nginx-test
重新映射启动容器
docker run --name nginx-test -d -p 80:80 -v /data/nginx/html:/usr/share/nginx/html
-v /data/nginx/conf/nginx.conf:/etc/nginx/nginx.conf
-v /data/nginx/logs:/var/log/nginx
-v /data/nginx/conf.d:/etc/nginx/conf.d -d nginx:latest
再次运行
以上就是本文的全部内容,希望对大家的学习有所帮助,也希望大家多多支持本站。
版权声明:本站文章来源标注为YINGSOO的内容版权均为本站所有,欢迎引用、转载,请保持原文完整并注明来源及原文链接。禁止复制或仿造本网站,禁止在非www.yingsoo.com所属的服务器上建立镜像,否则将依法追究法律责任。本站部分内容来源于网友推荐、互联网收集整理而来,仅供学习参考,不代表本站立场,如有内容涉嫌侵权,请联系alex-e#qq.com处理。
 关注官方微信