Pytest+request+Allure实现接口自动化框架
:
接口自动化是指模拟程序接口层面的自动化,由于接口不易变更,维护成本更小,所以深受各大公司的喜爱。
接口自动化包含2个部分,功能性的接口自动化测试和并发接口自动化测试。
本次文章着重介绍第一种,功能性的接口自动化框架。
一、简单介绍
环境:Mac、Python 3,Pytest,Allure,Request
pytest==3.6.0
pytest-allure-adaptor==1.7.10(弃用)
pytest-rerunfailures==5.0
configparser==3.5.0
PyYAML==3.12
requests==2.18.4
simplejson==3.16.0
----------------------------------------
2020-4-30更新
pytest==5.3.1
allure-pytest==2.8.6
allure-python-commons==2.8.6
⚠️注:pytest-allure-adaptor已弃用,改为allure-pytest;
安装allure-pytest时,需将pytest-allure-adaptor卸载
流程:读取Yaml测试数据-生成测试用例-执行测试用例-生成Allure报告
模块类的设计说明:
Request.py封装request方法,可以支持多协议扩展(get\post\put)Config.py读取配置文件,包括:不同环境的配置,email相关配置Log.py封装记录log方法,分为:debug、info、warning、error、criticalEmail.py封装smtplib方法,运行结果发送邮件通知Assert.py封装assert方法run.py核心代码。定义并执行用例集,生成报告
Yaml测试数据格式如下:
---
Basic:
  dec: "基础设置"
  parameters:
 -
url: /settings/basic.json
data: slug=da1677475c27
header: {
  "User-Agent": "Mozilla/5.0 (Macintosh; Intel Mac OS X 10_13_6) AppleWebKit/537.36 (KHTML, like Gecko)\
Chrome/67.0.3396.99 Safari/537.36",
  "Content-Type": "keep-alive"
  }
二、代码结构与框架流程
1、代码结构见下图:
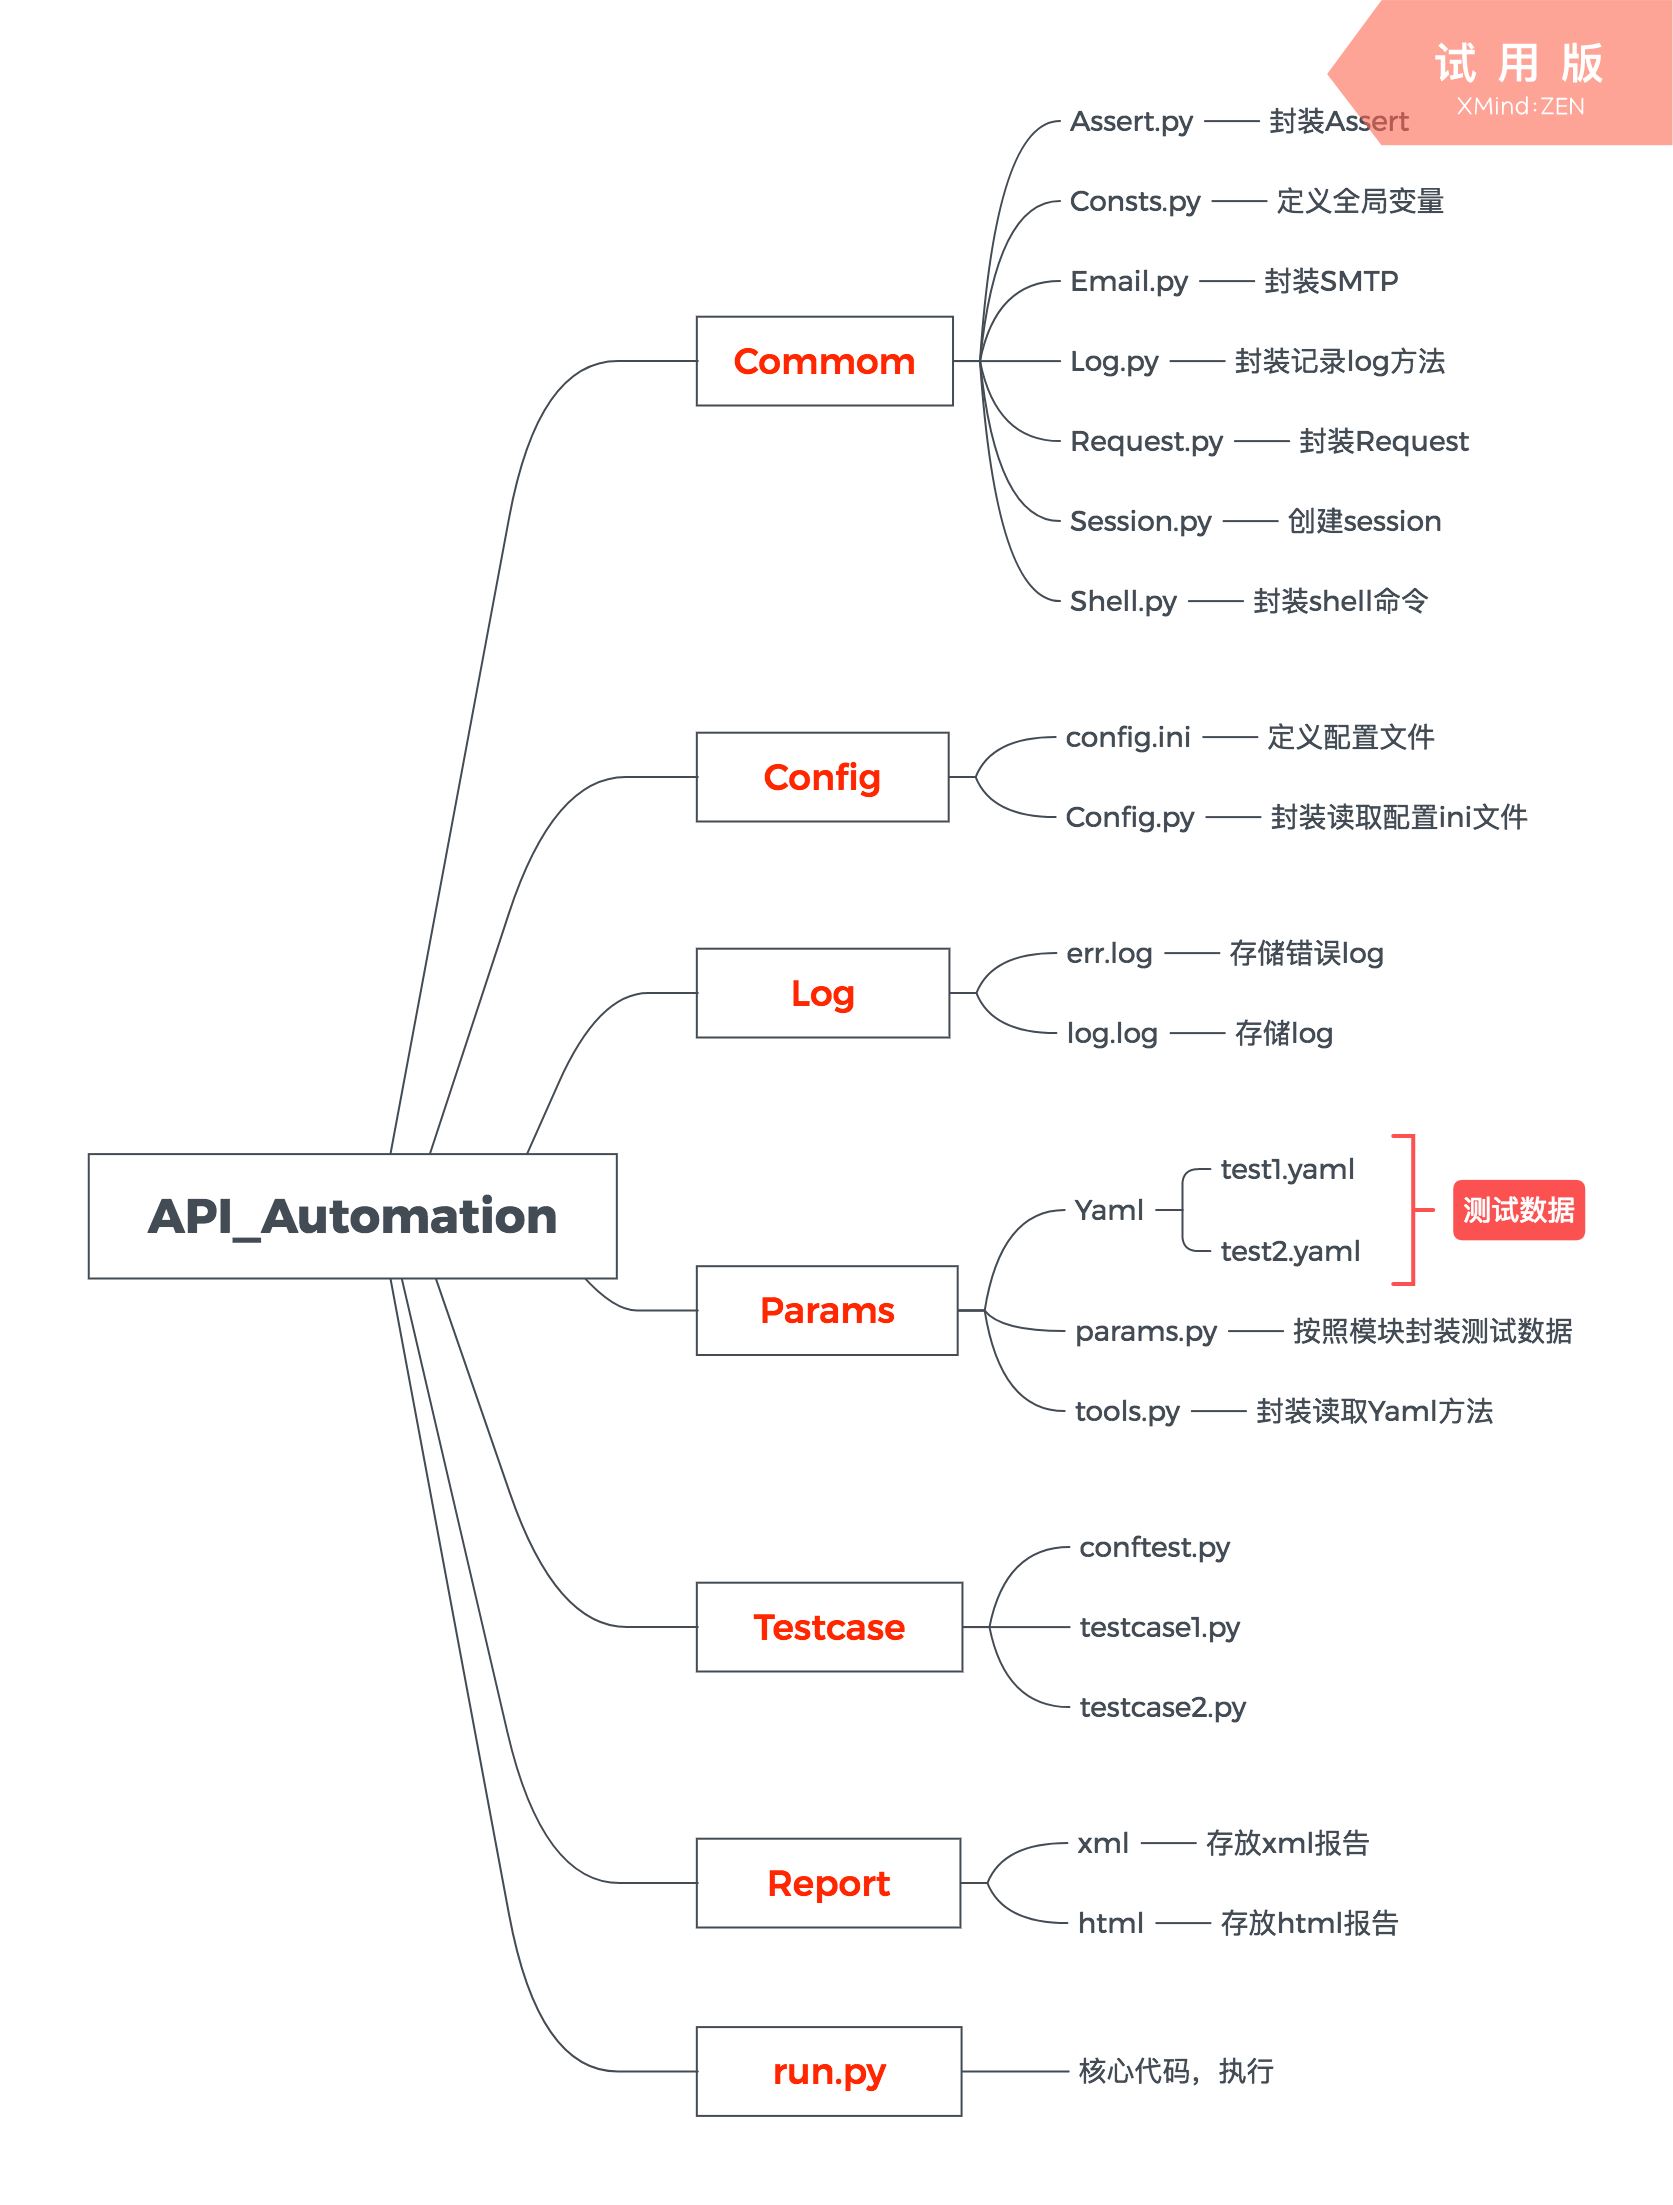
代码结构.jpg
2、框架流程见下图:
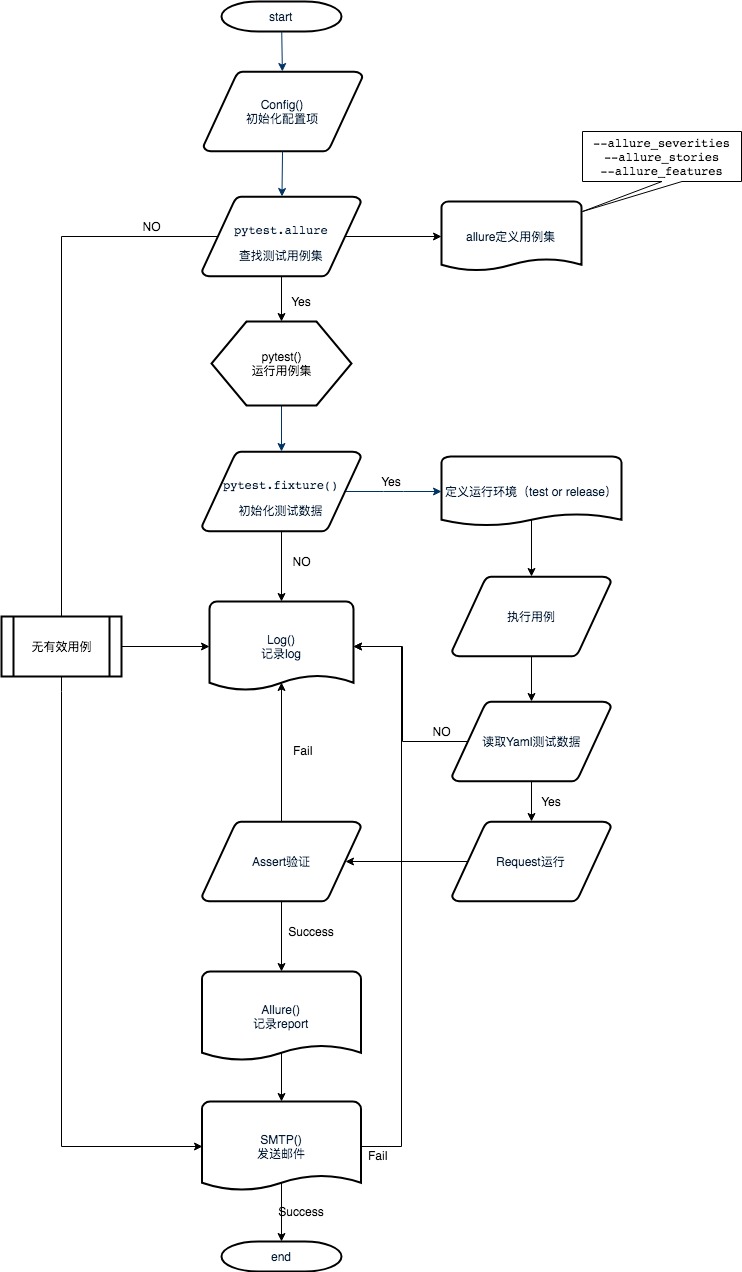
框架流程.jpg
三、详细功能和使用说明
1、定义配置文件config.ini
该文件中区分测试环境[private_debug]和正式环境[online_release]分别定义相关配置项,[mail]部分为邮件相关配置项
# http接口测试框架配置信息

[private_debug]
# debug测试服务
tester = your name
environment = debug
versionCode = your version
host = www.jianshu.com
loginHost = /Login
loginInfo = email=wang@user.com&password=123456

[online_release]
# release正式服务
tester = your name
environment = release
versionCode = v1.0
host = www.jianshu.com
loginHost = /Login
loginInfo = email=wang@user.com&password=123456

[mail]
#发送邮件信息
smtpserver = smtp.163.com
sender = test1@163.com
receiver = wang@user.com
username = wang@user.com
password = 123456
2、读取yaml测试数据后封装
yaml测试数据例子见第一节,一条接口可定义多条case数据,get_parameter为已封装好的读取yaml数据方法,循环读取后将多条case数据存在list中。
class Basic:
 params = get_parameter('Basic')
 url = []
 data = []
 header = []
 for i in range(0, len(params)):
  url.append(params[i]['url'])
  data.append(params[i]['data'])
  header.append(params[i]['header'])
3、编写用例
class TestBasic:
 @allure.feature('Home')
 @allure.severity('blocker')
 @allure.story('Basic')
 def test_basic_01(self, action):
  """
用例描述:未登陆状态下查看基础设置
  """
  conf = Config()
  data = Basic()
  test = Assert.Assertions()
  request = Request.Request(action)

  host = conf.host_debug
  req_url = 'http://' + host
  urls = data.url
  params = data.data
  headers = data.header

  api_url = req_url + urls[0]
  response = request.get_request(api_url, params[0], headers[0])

  assert test.assert_code(response['code'], 401)
  assert test.assert_body(response['body'], 'error', u'继续操作前请注册或者登录.')
  assert test.assert_time(response['time_consuming'], 400)
  Consts.RESULT_LIST.append('True')
4、运行整个框架run.py
if __name__ == '__main__':
 # 定义测试集
 args = ['-s', '-q', '--alluredir', xml_report_path]
 self_args = sys.argv[1:]
 pytest.main(args)
 cmd = 'allure generate %s -o %s' % (xml_report_path, html_report_path)

 try:
  shell.invoke(cmd)
 except:
  log.error('执行用例失败,请检查环境配置')
  raise

 try:
  mail = Email.SendMail()
  mail.sendMail()
 except:
  log.error('发送邮件失败,请检查邮件配置')
  raise
5、err.log实例
[ERROR 2018-08-24 09:55:37]Response body != expected_msg, expected_msg is {"error":"继续操作前请注册或者登录9."}, body is {"error":"继续操作前请注册或者登录."}
[ERROR 2018-08-24 10:00:11]Response time > expected_time, expected_time is 400, time is 482.745
[ERROR 2018-08-25 21:49:41]statusCode error, expected_code is 208, statusCode is 200
6、Assert部分代码
 def assert_body(self, body, body_msg, expected_msg):
  """
  验证response body中任意属性的值
  :param body:
  :param body_msg:
  :param expected_msg:
  :return:
  """
  try:
msg = body[body_msg]
assert msg == expected_msg
return True

  except:
self.log.error("Response body msg != expected_msg, expected_msg is %s, body_msg is %s" % (expected_msg, body_msg))
Consts.RESULT_LIST.append('fail')

raise

 def assert_in_text(self, body, expected_msg):
  """
  验证response body中是否包含预期字符串
  :param body:
  :param expected_msg:
  :return:
  """
  try:
text = json.dumps(body, ensure_ascii=False)
# print(text)
assert expected_msg in text
return True

  except:
self.log.error("Response body Does not contain expected_msg, expected_msg is %s" % expected_msg)
Consts.RESULT_LIST.append('fail')

raise
7、Request部分代码
 def post_request(self, url, data, header):
  """
  Post请求
  :param url:
  :param data:
  :param header:
  :return:
  """
  if not url.startswith('http://'):
url = '%s%s' % ('http://', url)
print(url)
  try:
if data is None:
 response = self.get_session.post(url=url, headers=header)
else:
 response = self.get_session.post(url=url, params=data, headers=header)

  except requests.RequestException as e:
print('%s%s' % ('RequestException url: ', url))
print(e)
return ()

  except Exception as e:
print('%s%s' % ('Exception url: ', url))
print(e)
return ()

  # time_consuming为响应时间,单位为毫秒
  time_consuming = response.elapsed.microseconds/1000
  # time_total为响应时间,单位为秒
  time_total = response.elapsed.total_seconds()

  Common.Consts.STRESS_LIST.append(time_consuming)

  response_dicts = dict()
  response_dicts['code'] = response.status_code
  try:
response_dicts['body'] = response.json()
  except Exception as e:
print(e)
response_dicts['body'] = ''

  response_dicts['text'] = response.text
  response_dicts['time_consuming'] = time_consuming
  response_dicts['time_total'] = time_total

  return response_dicts
四、Allure报告及Email
1、Allure报告总览,见下图:
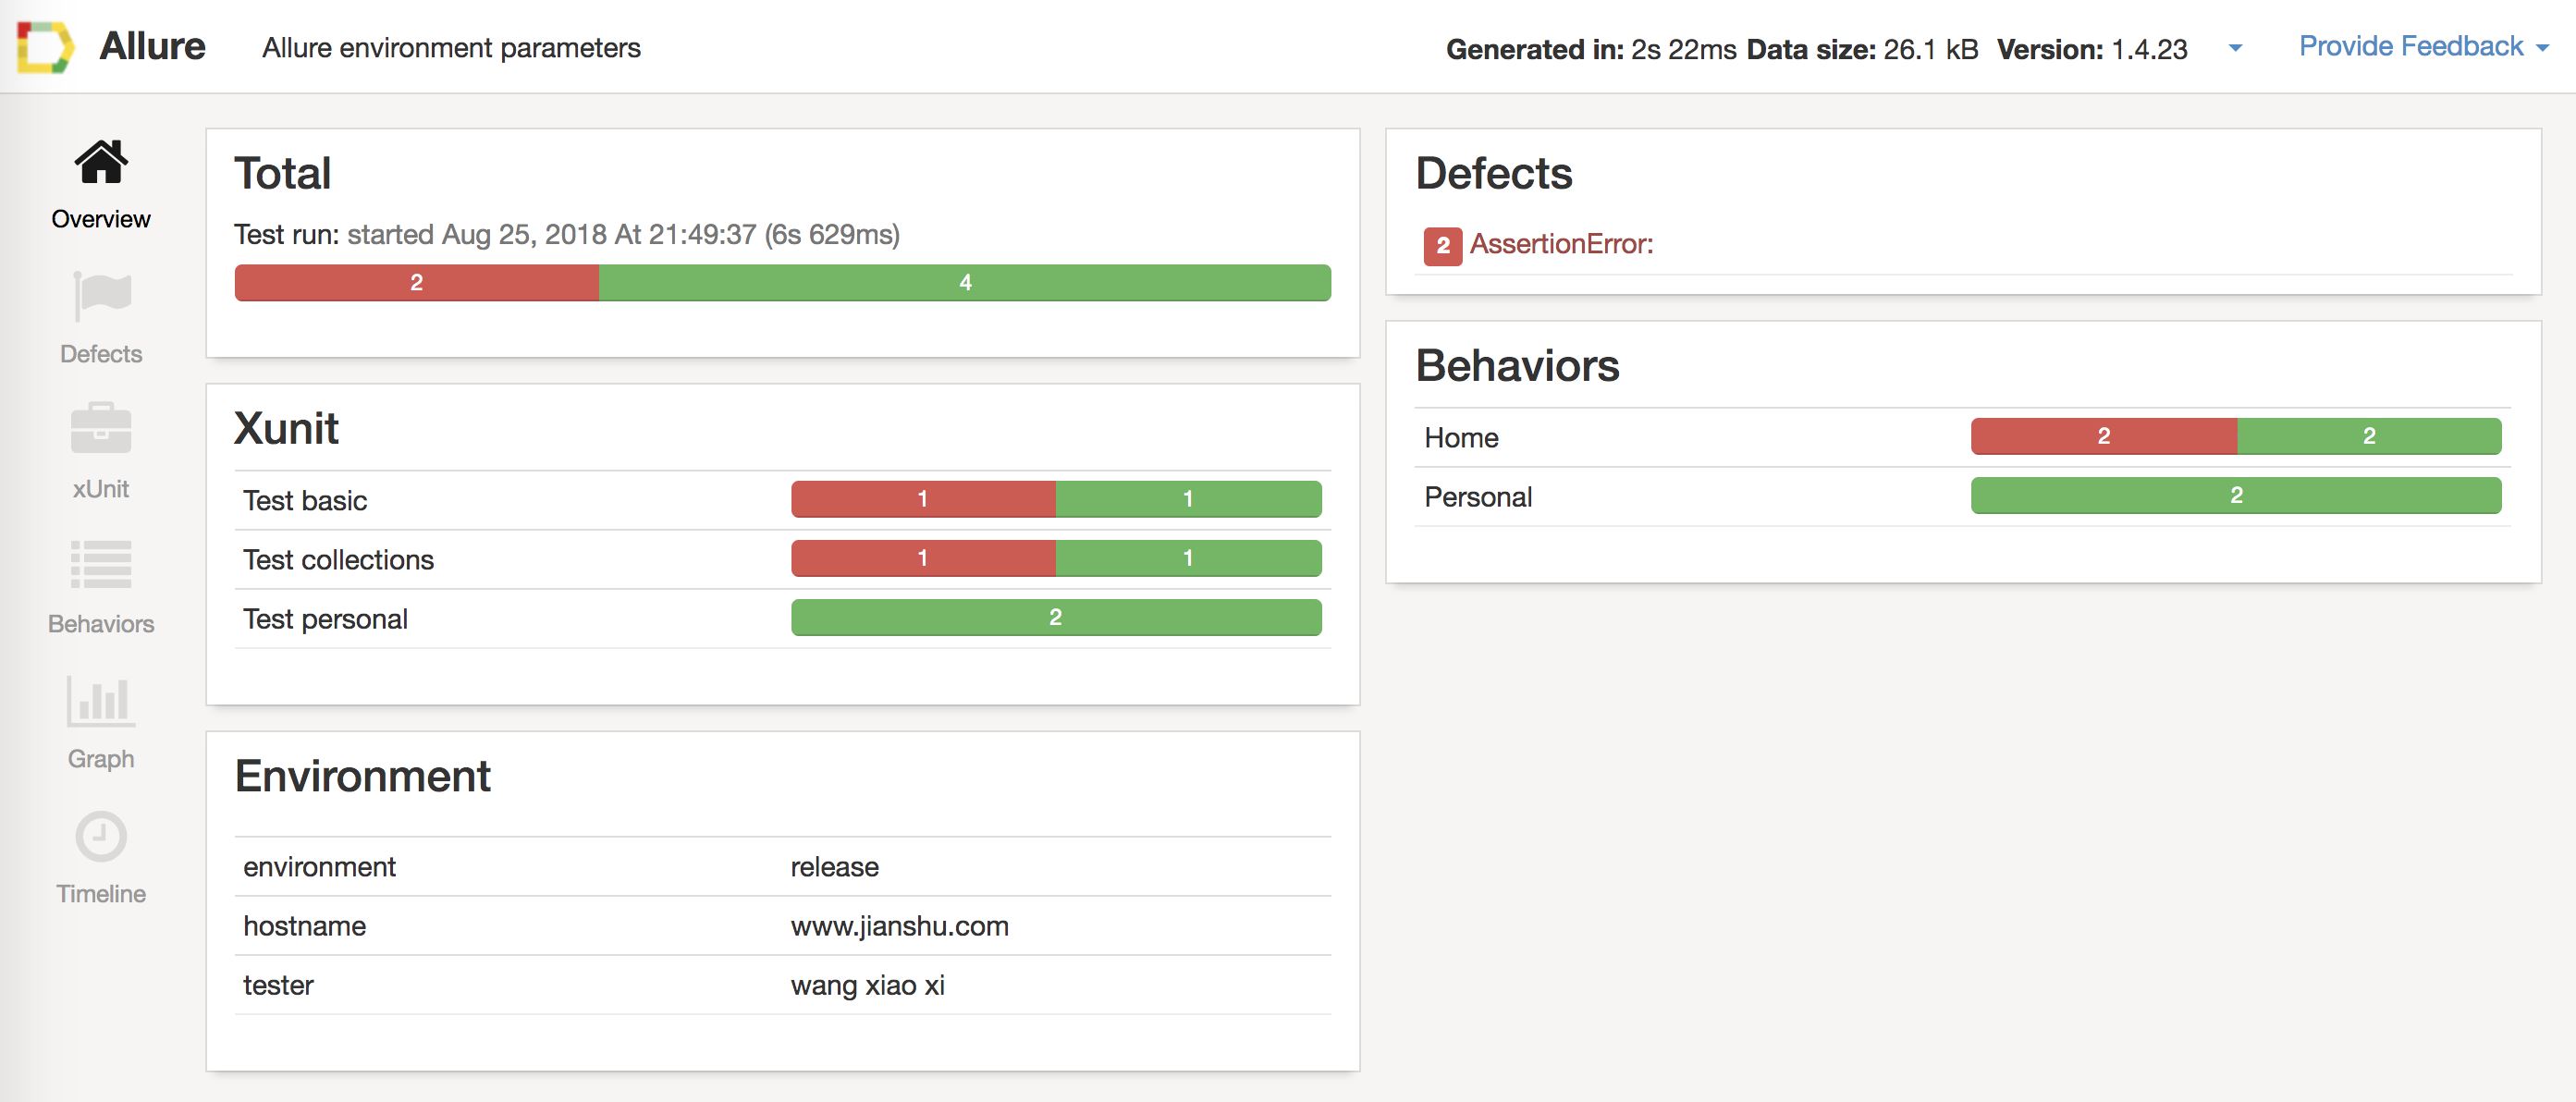
Allure报告.jpg
2、Email见下图:
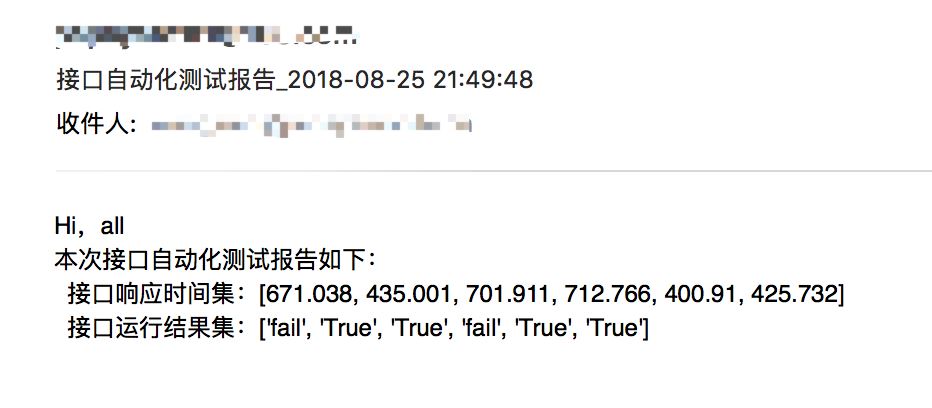
Email.jpg
五、后续优化
1、集成Jenkins,使用Jenkins插件生成Allure报告
2、多线程并发接口自动化测试
3、接口加密,参数加密
到此这篇关于Pytest+request+Allure实现接口自动化框架 的文章就介绍到这了,更多相关Pytest接口自动化框架 内容请搜索本站以前的文章或继续浏览下面的相关文章希望大家以后多多支持本站!
版权声明:本站文章来源标注为YINGSOO的内容版权均为本站所有,欢迎引用、转载,请保持原文完整并注明来源及原文链接。禁止复制或仿造本网站,禁止在非www.yingsoo.com所属的服务器上建立镜像,否则将依法追究法律责任。本站部分内容来源于网友推荐、互联网收集整理而来,仅供学习参考,不代表本站立场,如有内容涉嫌侵权,请联系alex-e#qq.com处理。
 关注官方微信