Python运行第一个PySide2的窗体程序
发布日期:2022-02-21 09:30 | 文章来源:站长之家
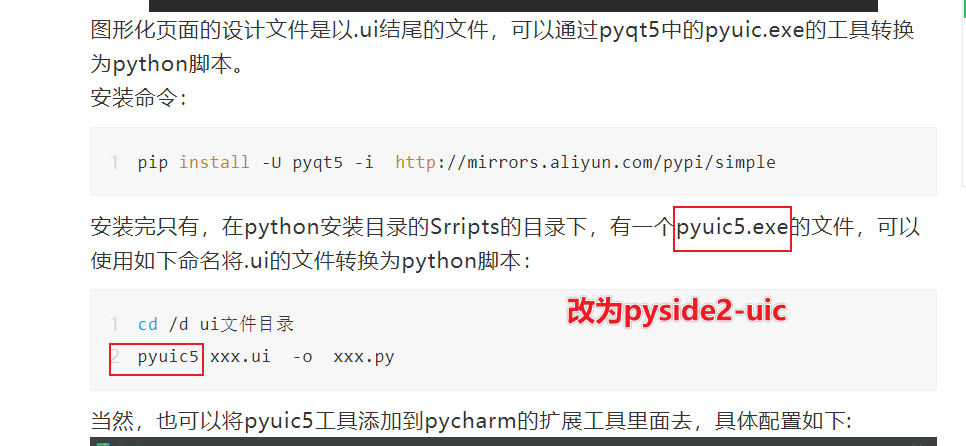
上一章节介绍了PySide2的安装以及如何去启动程序进行页面设计,并且将工具集成到pycharm的扩展工具中去,有2个地方写的不对,用的是pyuic工具,需要改一下,改成pyside2-uic.exe。具体改动点:
pycharm扩展工具中的配置也需要调整一下:
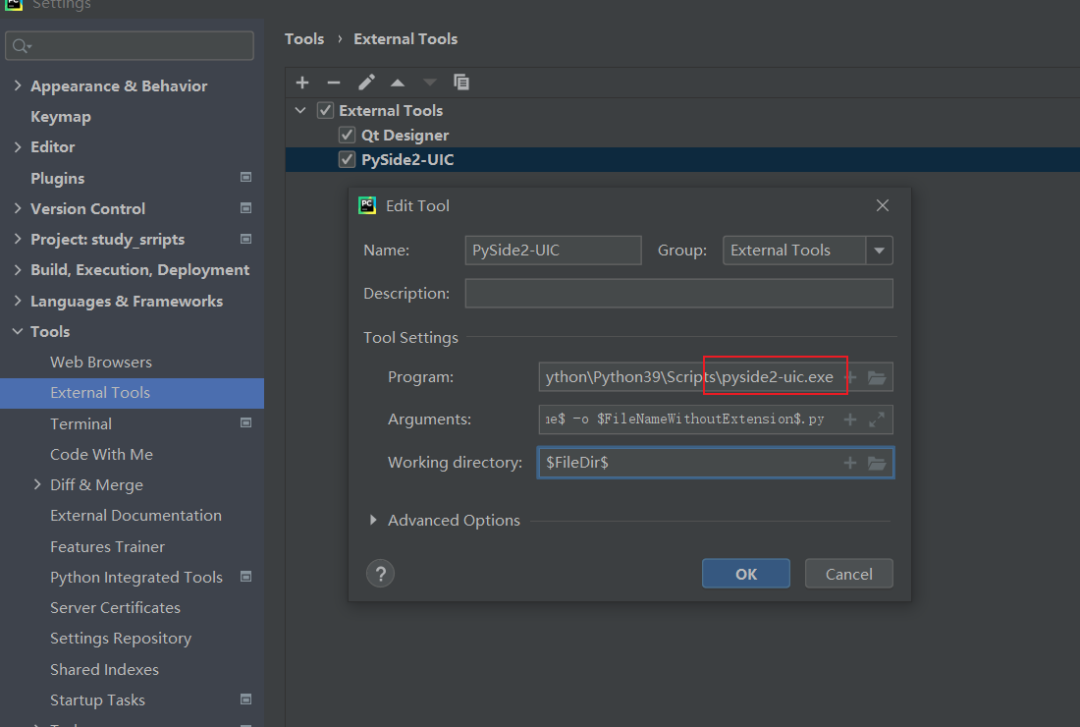
上一篇的配置写的是pyqt5的配置,这里主要采用PySide2进行学习。
修改为正确的配置后,鼠标选中ui文件,右键选择扩展工具中的pyside2-uic就可以转换为python脚本。
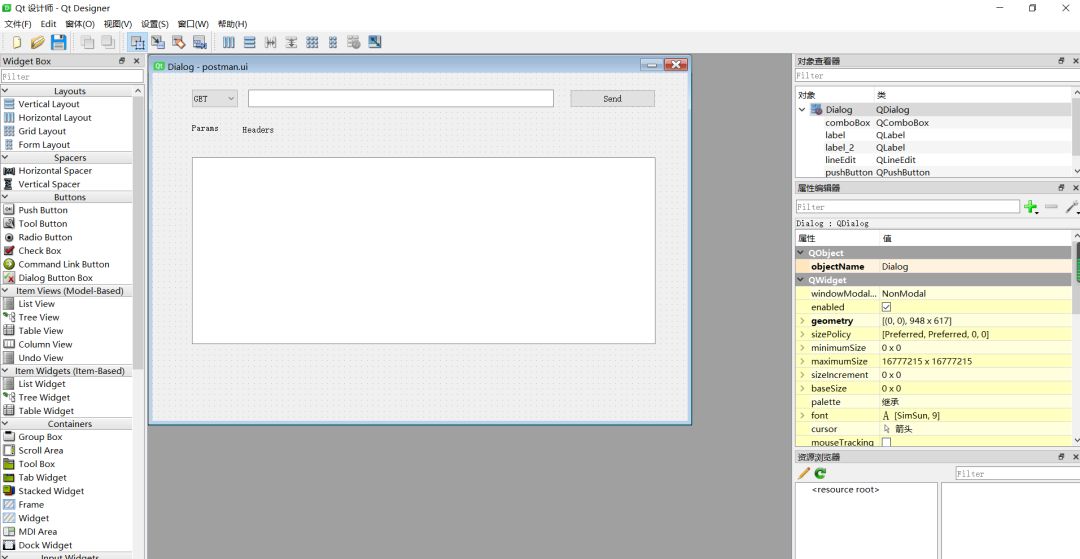
先看一下我画的一个简单的GUI页面:
保存页面文件后,后缀是.ui的格式,用文本文件打开的话,内容是xml格式的:
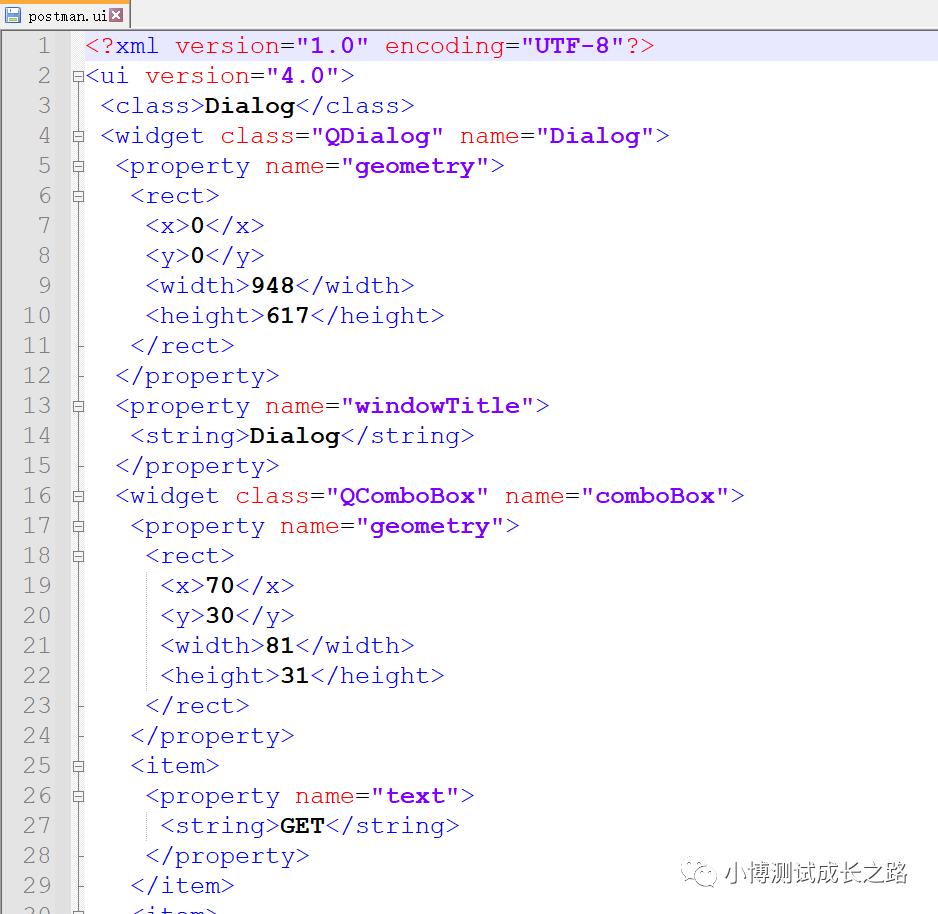
postman.ui源码:
<?xml version="1.0" encoding="UTF-8"?>
<ui version="4.0">
 <class>Dialog</class>
 <widget class="QDialog" name="Dialog">
  <property name="geometry">
<rect>
 <x>0</x>
 <y>0</y>
 <width>948</width>
 <height>617</height>
</rect>
  </property>
  <property name="windowTitle">
<string>Dialog</string>
  </property>
  <widget class="QComboBox" name="comboBox">
<property name="geometry">
 <rect>
  <x>70</x>
  <y>30</y>
  <width>81</width>
  <height>31</height>
 </rect>
</property>
<item>
 <property name="text">
  <string>GET</string>
 </property>
</item>
<item>
 <property name="text">
  <string>POST</string>
 </property>
</item>
  </widget>
  <widget class="QLineEdit" name="lineEdit">
<property name="geometry">
 <rect>
  <x>170</x>
  <y>30</y>
  <width>541</width>
  <height>31</height>
 </rect>
</property>
  </widget>
  <widget class="QPushButton" name="pushButton">
<property name="geometry">
 <rect>
  <x>740</x>
  <y>30</y>
  <width>151</width>
  <height>31</height>
 </rect>
</property>
<property name="text">
 <string>Send</string>
</property>
  </widget>
  <widget class="QLabel" name="label">
<property name="geometry">
 <rect>
  <x>70</x>
  <y>90</y>
  <width>72</width>
  <height>15</height>
 </rect>
</property>
<property name="text">
 <string>Params</string>
</property>
  </widget>
  <widget class="QLabel" name="label_2">
<property name="geometry">
 <rect>
  <x>160</x>
  <y>90</y>
  <width>121</width>
  <height>21</height>
 </rect>
</property>
<property name="text">
 <string>Headers</string>
</property>
  </widget>
  <widget class="QTextEdit" name="textEdit">
<property name="geometry">
 <rect>
  <x>70</x>
  <y>150</y>
  <width>821</width>
  <height>331</height>
 </rect>
</property>
  </widget>
 </widget>
 <resources/>
 <connections/>
</ui>
转换之后的python脚本:postman.py
# -*- coding: utf-8 -*-


################################################################################
## Form generated from reading UI file 'postman.ui'
##
## Created by: Qt User Interface Compiler version 5.15.2
##
## WARNING! All changes made in this file will be lost when recompiling UI file!
################################################################################


from PySide2.QtCore import *
from PySide2.QtGui import *
from PySide2.QtWidgets import *


class Ui_Dialog(object):
 def setupUi(self, Dialog):
  if not Dialog.objectName():
Dialog.setObjectName(u"Dialog")
  Dialog.resize(948, 617)
  self.comboBox = QComboBox(Dialog)
  self.comboBox.addItem("")
  self.comboBox.addItem("")
  self.comboBox.setObjectName(u"comboBox")
  self.comboBox.setGeometry(QRect(70, 30, 81, 31))
  self.lineEdit = QLineEdit(Dialog)
  self.lineEdit.setObjectName(u"lineEdit")
  self.lineEdit.setGeometry(QRect(170, 30, 541, 31))
  self.pushButton = QPushButton(Dialog)
  self.pushButton.setObjectName(u"pushButton")
  self.pushButton.setGeometry(QRect(740, 30, 151, 31))
  self.label = QLabel(Dialog)
  self.label.setObjectName(u"label")
  self.label.setGeometry(QRect(70, 90, 72, 15))
  self.label_2 = QLabel(Dialog)
  self.label_2.setObjectName(u"label_2")
  self.label_2.setGeometry(QRect(160, 90, 121, 21))
  self.textEdit = QTextEdit(Dialog)
  self.textEdit.setObjectName(u"textEdit")
  self.textEdit.setGeometry(QRect(70, 150, 821, 331))


  self.retranslateUi(Dialog)


  QMetaObject.connectSlotsByName(Dialog)
 # setupUi


 def retranslateUi(self, Dialog):
  Dialog.setWindowTitle(QCoreApplication.translate("Dialog", u"Dialog", None))
  self.comboBox.setItemText(0, QCoreApplication.translate("Dialog", u"GET", None))
  self.comboBox.setItemText(1, QCoreApplication.translate("Dialog", u"POST", None))


  self.pushButton.setText(QCoreApplication.translate("Dialog", u"Send", None))
  self.label.setText(QCoreApplication.translate("Dialog", u"Params", None))
  self.label_2.setText(QCoreApplication.translate("Dialog", u"Headers", None))
 # retranslateUi
单单有以上两个脚本是无法运行的,还需要单独再写几行代码来加载页面窗口进行展示:
run_postman.py:
import sys
from PySide2.QtWidgets import QApplication, QMainWindow
from postman import Ui_Dialog


if __name__ == "__main__":
 # 创建一个Application对象
 app = QApplication(sys.argv)
 # 创建一个窗体对象
 MainWindow = QMainWindow()

 ui = Ui_Dialog()
 ui.setupUi(MainWindow)
 # 设置窗口显示
 MainWindow.show()
 sys.exit(app.exec_())
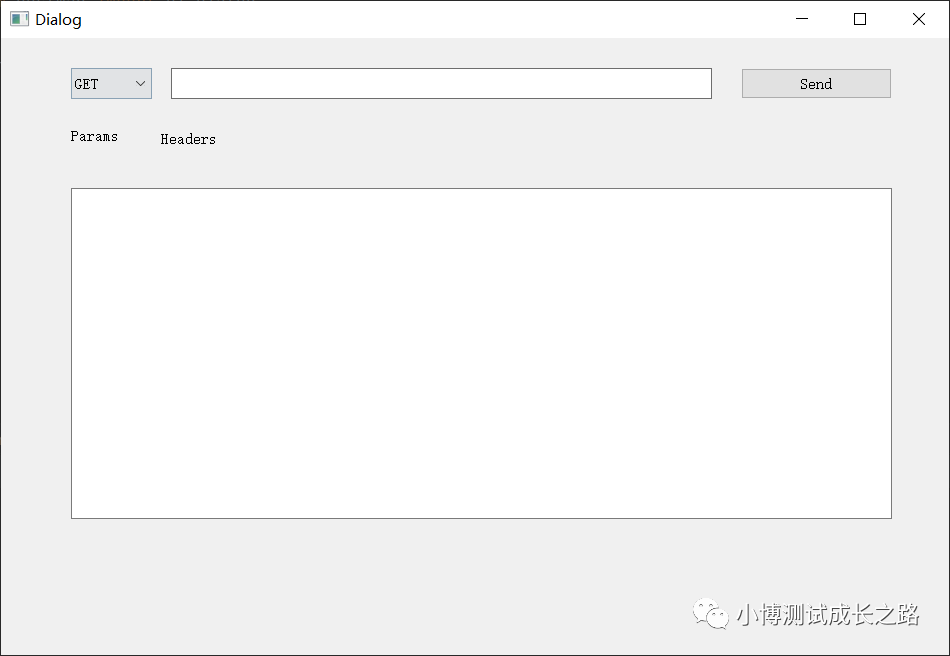
运行后的效果如下图所示:
大家感兴趣的话,可以根据自己的喜好去调整页面设计,实现自己的测试小工具。
到此这篇关于Python运行第一个PySide2的窗体程序的文章就介绍到这了,更多相关Python运行第一个PySide2的窗体程序内容请搜索本站以前的文章或继续浏览下面的相关文章希望大家以后多多支持本站!
版权声明:本站文章来源标注为YINGSOO的内容版权均为本站所有,欢迎引用、转载,请保持原文完整并注明来源及原文链接。禁止复制或仿造本网站,禁止在非www.yingsoo.com所属的服务器上建立镜像,否则将依法追究法律责任。本站部分内容来源于网友推荐、互联网收集整理而来,仅供学习参考,不代表本站立场,如有内容涉嫌侵权,请联系alex-e#qq.com处理。
相关文章
 关注官方微信