pyhthon绘制超炫酷的心形线星形线摆线
摆线
最简单的旋轮线就是摆线,指圆在直线上滚动时,圆周上某定点的轨迹。
设圆的半径为 r ,在x轴上滚动 x距离则意味着旋转了 x \ r 弧度,则其滚动所产生的摆线如下
r = 1
theta = np.arange(0,6.4,0.1)
xCircle0 = np.cos(theta)
yCircle0 = 1+np.sin(theta)
fig = plt.figure(figsize=(15,4))
ax = fig.add_subplot(autoscale_on=False,
 xlim=(1,10),ylim=(0,2))
ax.grid()
circle, = ax.plot(xCircle0,yCircle0,'-',lw=1)
point, = ax.plot([1],[1],'o')
trace, = ax.plot([],[],'-', lw=1)
theta_text = ax.text(0.02,0.85,'',transform=ax.transAxes)
textTemplate = '''x = %.1f°\n'''
xs,ys = [], []
def animate(x):
 if(x==0):
  xs.clear()
  ys.clear()
 xCycloid = x + r*np.cos(-x) #由于是向右顺时针滚,所以角度为负
 yCycloid = 1 + r*np.sin(-x)
 xCircle = xCircle0+x
 xs.append(xCycloid)
 ys.append(yCycloid)
 circle.set_data(xCircle,yCircle0)
 point.set_data([xCycloid],[yCycloid])
 trace.set_data(xs,ys)
 theta_text.set_text(textTemplate % x)
 return circle, point, trace, theta_text
frames = np.arange(0,10,0.02)
ani = animation.FuncAnimation(fig, animate, frames,
 interval=5, blit=True)
ani.save("Cycloid.gif")
plt.show()
如果选取圆内或圆外的一点描成轨迹,则为次摆线,圆外点的轨迹为长幅摆线,
反之则为短幅摆线

代码
r = 1
rIn = 0.5
theta = np.arange(0,6.4,0.1)
xCircle0 = np.cos(theta)
yCircle0 = 1+np.sin(theta)
xCircleOut0 = rIn*np.cos(theta)
yCircleOut0 = 1+rIn*np.sin(theta)
fig = plt.figure(figsize=(20,3))
ax = fig.add_subplot(autoscale_on=False,
 xlim=(1,15),ylim=(0,2))
ax.grid()
circle, = ax.plot(xCircle0,yCircle0,'-',lw=1)
circleOut, = ax.plot(xCircleOut0,yCircleOut0,linestyle='--',lw=1)
point, = ax.plot([1],[1],'o')
pointOut, = ax.plot([1],[1.5],'o')
trace, = ax.plot([],[],'-', lw=1)
theta_text = ax.text(0.02,0.85,'',transform=ax.transAxes)
textTemplate = '''x = %.1f\n'''
xs,ys = [], []
def animate(x):
 if(x==0):
  xs.clear()
  ys.clear()
 xCycloid = x + r*np.cos(-x)
 yCycloid = 1 + r*np.sin(-x)
 xCycloidOut = x + rIn*np.cos(-x)
 yCycloidOut = 1 + rIn*np.sin(-x)
 xs.append(xCycloidOut)
 ys.append(yCycloidOut)
 circle.set_data(xCircle0+x,yCircle0)
 circleOut.set_data(xCircleOut0+x,yCircleOut0)
 point.set_data([xCycloid],[yCycloid])
 pointOut.set_data([xCycloidOut],[yCycloidOut])
 trace.set_data(xs,ys)
 theta_text.set_text(textTemplate % x)
 return circle, circleOut, point, pointOut, trace, theta_text
frames = np.arange(0,15,0.1)
ani = animation.FuncAnimation(fig, animate, frames,
 interval=50, blit=True)
ani.save("Cycloid.gif")
plt.show()

随着 λ 的变化,图像的变化过程为
外摆线和心脏线
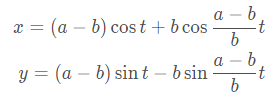
如果在一个圆绕着另一个固定的圆滚动,如果在圆外滚动,则动圆上的某相对固定点的轨迹为外摆线;若在圆内滚动,则某点的轨迹为内摆线。设定圆半径为 a ,动圆半径为 b ,则绕行旋转 t度后,动圆圆心圆心位置为
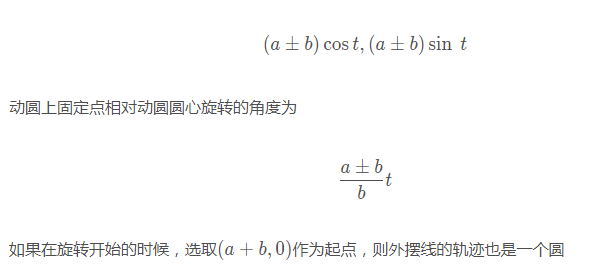
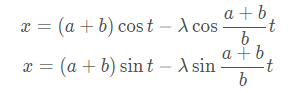
若选点 ( a , 0 ) 作为起点,则外摆线的参数方程为
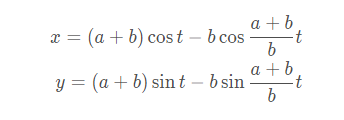
a = b 时就得到了著名的心脏线,被许多直男奉为经典
a = 1
b = 1
theta = np.arange(0,6.4,0.05)
fig = plt.figure(figsize=(10,10))
ax = fig.add_subplot(autoscale_on=False,
 xlim=(-3,3),ylim=(-3,3))
theta_text = ax.text(0.02,0.85,'',transform=ax.transAxes)
textTemplate = '''θ = %.1f°\n'''
ax.grid()
xCircle,yCircle = np.cos(theta),np.sin(theta)
ax.plot(a*xCircle,a*yCircle,'-',lw=1)
pt, = ax.plot([a+b],[0],'*')
cir, = ax.plot(a+b+b*yCircle,b*yCircle,'-',lw=1)
cycloid, = ax.plot([], [], '-', lw=1)
xs,ys = [],[]
def animate(t):
 if(t==0):
  xs.clear()
  ys.clear()
 cenX = (a+b)*np.cos(t)
 cenY = (a+b)*np.sin(t)
 cir.set_data(cenX+b*xCircle,cenY+b*yCircle)
 newX = cenX - b*np.cos((a+b)/b*t)
 newY = cenY - b*np.sin((a+b)/b*t)
 xs.append(newX)
 ys.append(newY)
 pt.set_data([newX],[newY])
 cycloid.set_data(xs,ys)
 theta_text.set_text(textTemplate % t)
 return cycloid, cir, pt, theta_text
ani = animation.FuncAnimation(fig, animate, theta,
 interval=50, blit=True)
ani.save("Cycloid.gif")
plt.show()
如果更改 a \ b比值,则可得到
a \ b=5
a \ b=1\2

a \ b=2\3
对 a\b进行约分得到 m\ n,曲线由m支组成,总共绕定圆 n周,然后闭合。观察 1 \b = 1 \2 时的曲线,可以看到其前 p i 个值和后 π 个值组成的心形更好看。
如果 a\b是无理数,则永远也不会闭合,例如令 b = e ,由于图片超过5M,所以就不上传了。这个图总共转了17圈,到后期十分考验视力,为了让规律更清晰,我们选择只绘制尖点附近的运动状态,

内摆线与星形线
当动圆在定圆内部转动时,则为内摆线,其方程为
a\b=4
a\b=5
a \b = 1\3
当 a \b = 4 时,其方程可化简为

被称为星形线。
接下来按照惯例,画一下随着 a\ b 比值的变化,内外摆线形状的变化过程
内摆线
代码如下
#test.py
import argparse  #用于命令行的交互
parser = argparse.ArgumentParser()
parser.add_argument('bStart', type=float)
parser.add_argument('bEnd', type=float)
args = parser.parse_args()
a = 1
bStart = args.bStart
bEnd = args.bEnd
fig = plt.figure(figsize=(10,10))
ax = fig.add_subplot(autoscale_on=False,
 xlim=(-(a+2*bEnd),(a+2*bEnd)),ylim=(-(a+2*bEnd),(a+2*bEnd)))
theta_text = ax.text(0.02,0.85,'',transform=ax.transAxes)
textTemplate = '''a=1, b= %.2f\n'''
ax.grid()
t = np.arange(0,6.4,0.05)
ax.plot(a*np.cos(t),a*np.sin(t),'-',lw=1)
cycloid, = ax.plot([], [], '-', lw=1)
xs,ys = [],[]
t = np.arange(0,30,0.05)
def animate(b):
 xs = (a+b)*np.cos(t) - b*np.cos((a+b)/b*t)
 ys = (a+b)*np.sin(t) - b*np.sin((a+b)/b*t)
 cycloid.set_data(xs,ys)
 theta_text.set_text(textTemplate % b)
 return cycloid, theta_text
ani = animation.FuncAnimation(fig, animate, np.arange(bEnd,bStart,-0.02),
 interval=50, blit=True)
plt.show()
ani.save("Cycloid.gif")
在命令行中输入
python test.py -2 2
内摆线和外摆线同常规的摆线一样,皆具有对应的长辐或短辐形式,其标准方程为
当 b > 0时为外摆线, b < 0时为内摆线,对于星形线而言,其变化过程如图所示
以上就是pyhthon绘制超炫酷的心形线星形线摆线的详细内容,更多关于pyhthon绘制心形星形线摆线的资料请关注本站其它相关文章!
版权声明:本站文章来源标注为YINGSOO的内容版权均为本站所有,欢迎引用、转载,请保持原文完整并注明来源及原文链接。禁止复制或仿造本网站,禁止在非www.yingsoo.com所属的服务器上建立镜像,否则将依法追究法律责任。本站部分内容来源于网友推荐、互联网收集整理而来,仅供学习参考,不代表本站立场,如有内容涉嫌侵权,请联系alex-e#qq.com处理。
 关注官方微信