Python实战之基于OpenCV的美颜挂件制作
基于 Snapchat 的增强现实
胡子挂件融合
第一个项目中,我们将在检测到的脸上覆盖了一个小胡子。我们可以使用从摄像头捕获的连续视频帧,也可以使用单张测试图像。在进行实际讲解程序的关键步骤前,首先查看应用程序预期输出的结果图像:
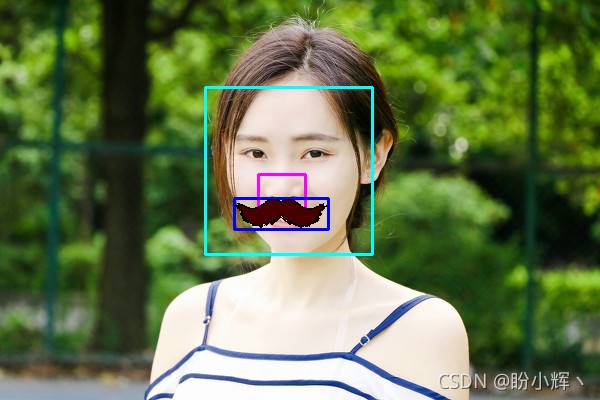
项目的第一步是检测图像中的人脸。如上图所示,使用青色矩形绘制图像中检测到的人脸的位置和大小;接下来迭代图像中所有检测到的人脸,在其区域内搜索鼻子,粉红色矩形表示图像中检测到的鼻子;检测到鼻子之后,就要根据之前计算出的鼻子的位置和大小来调整我们想要覆盖“胡子”挂件的区域,蓝色矩形表示计算获得的胡须将被覆盖的区域位置。如果处理的目标是连续视频帧,在处理完成所有检测到的人脸后,将继续分析下一帧。
根据上述描述,程序应当首先检测图像中的人脸和鼻子。为了检测这些对象,创建了两个分类器,一个用于检测人脸,另一个用于检测鼻子:
# 用于人脸和鼻子检测的级联分类器
face_cascade = cv2.CascadeClassifier("haarcascade_frontalface_default.xml")
nose_cascade = cv2.CascadeClassifier("haarcascade_mcs_nose.xml")
一旦创建了分类器,下一步就是使用 cv2.detectMultiScale() 函数检测图像中的这些对象。cv2.detectMultiScale() 函数检测输入灰度图像中不同大小的对象,并将检测到的对象作为矩形列表返回。例如,检测人脸时使用以下代码:
faces = face_cascade.detectMultiScale(gray, 1.3, 5)
接下来,遍历检测到的人脸,尝试检测鼻子:
# 遍历检测到的人脸
for (x, y, w, h) in faces:
 # 根据检测到的面大小创建感兴趣区域(ROI)
 roi_gray = gray[y:y + h, x:x + w]
 roi_color = frame[y:y + h, x:x + w]
 # 在检测到的人脸内检测鼻子
 noses = nose_cascade.detectMultiScale(roi_gray)
检测到鼻子后,遍历所有检测到的鼻子,并计算将被“胡子”挂件覆盖的区域。过滤掉错误的鼻子位置后,将“胡子”挂件根据先前计算的区域覆盖在图像上:
for (nx, ny, nw, nh) in noses:
 # 计算将被“胡子”挂件覆盖的区域坐标
 x1 = int(nx - nw / 2)
 x2 = int(nx + nw / 2 + nw)
 y1 = int(ny + nh / 2 + nh / 8)
 y2 = int(ny + nh + nh / 4 + nh / 6)
 if x1 < 0 or x2 < 0 or x2 > w or y2 > h:
  continue
 # 计算将被“胡子”挂件覆盖的区域尺寸
 img_moustache_res_width = int(x2 - x1)
 img_moustache_res_height = int(y2 - y1)
 # 调整掩膜大小,使其与放置“胡子”挂件的区域相等
 mask = cv2.resize(img_moustache_mask, (img_moustache_res_width, img_moustache_res_height))
 # 翻转掩膜
 mask_inv = cv2.bitwise_not(mask)
 # 将“胡子”挂件调整为所需区域
 img = cv2.resize(img_moustache, (img_moustache_res_width, img_moustache_res_height))
 # 获取原始图像的ROI
 roi = roi_color[y1:y2, x1:x2]
 # 创建ROI背景和ROI前景
 roi_bakground = cv2.bitwise_and(roi, roi, mask=mask_inv)
 roi_foreground = cv2.bitwise_and(img, img, mask=mask)
 # 获取结果
 res = cv2.add(roi_bakground, roi_foreground)
 # 将res置于原始图像中
 roi_color[y1:y2, x1:x2] = res
 break
上述程序的关键在于 img_mustache_mask 图像。此图像是使用要融合的“胡子”图像的 Alpha 通道创建的,使用此图像,将可以只绘制叠加图像的前景,基于融合图像的 alpha 通道创建的“胡子”蒙版如下:
img_moustache = cv2.imread('moustache.png', -1)
img_moustache_mask = img_moustache[:, :, 3]
cv2.imshow("img moustache mask", img_moustache_mask)
获得的胡子蒙版,如下所示:

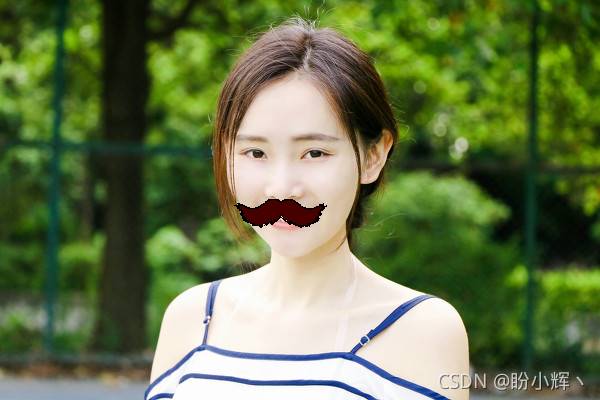
增强现实融合“胡子”挂件后的结果如下所示:
这里不再针对视频帧的处理进行讲解,因为其方法与单个图像相同,在接下来的完整代码中,给出对连续视频帧进行增强现实的代码。
完整代码
import cv2
# 用于人脸和鼻子检测的级联分类器
face_cascade = cv2.CascadeClassifier("haarcascade_frontalface_default.xml")
nose_cascade = cv2.CascadeClassifier("haarcascade_mcs_nose.xml")
# 加载胡子图像
img_moustache = cv2.imread('moustache.png', -1)
# 创建胡子蒙版
img_moustache_mask = img_moustache[:, :, 3]
# 将胡子图像转换为 BGR 图像
img_moustache = img_moustache[:, :, 0:3]
# 创建 VideoCapture 对象
video_capture = cv2.VideoCapture(0)
while True:
 # 从 VideoCapture 对象捕获帧
 ret, frame = video_capture.read()
 # 将 frame 转换为灰度图像
 gray = cv2.cvtColor(frame, cv2.COLOR_BGR2GRAY)
 # 检测人脸
 faces = face_cascade.detectMultiScale(gray, 1.3, 5)
 # 迭代检测到的人脸
 for (x, y, w, h) in faces:
  # 根据检测到的人脸大小创建ROI
  roi_gray = gray[y:y + h, x:x + w]
  roi_color = frame[y:y + h, x:x + w]
  # 在检测到的人脸中检测鼻子
  noses = nose_cascade.detectMultiScale(roi_gray)
  for (nx, ny, nw, nh) in noses:
# 计算将放置 “胡子” 挂件的坐标
x1 = int(nx - nw / 2)
x2 = int(nx + nw / 2 + nw)
y1 = int(ny + nh / 2 + nh / 8)
y2 = int(ny + nh + nh / 4 + nh / 6)
if x1 < 0 or x2 < 0 or x2 > w or y2 > h:
 continue
# 计算“胡子”挂件区域的尺寸
img_moustache_res_width = int(x2 - x1)
img_moustache_res_height = int(y2 - y1)
# 根据挂件区域缩放“胡子”蒙版
mask = cv2.resize(img_moustache_mask, (img_moustache_res_width, img_moustache_res_height))
# 翻转蒙版
mask_inv = cv2.bitwise_not(mask)
# 缩放“胡子”挂件
img = cv2.resize(img_moustache, (img_moustache_res_width, img_moustache_res_height))
# 从原始图像中获取ROI
roi = roi_color[y1:y2, x1:x2]
# 创建ROI前景和背景
roi_bakground = cv2.bitwise_and(roi, roi, mask=mask_inv)
roi_foreground = cv2.bitwise_and(img, img, mask=mask)
# roi_bakground 与 roi_foreground 加和获取结果
res = cv2.add(roi_bakground, roi_foreground)
roi_color[y1:y2, x1:x2] = res
break
 # 显示结果
 cv2.imshow('Snapchat-based OpenCV moustache overlay', frame)
 # 按下 “q” 键退出
 if cv2.waitKey(1) & 0xFF == ord('q'):
  break
# 释放资源
video_capture.release()
cv2.destroyAllWindows()
眼镜挂件融合
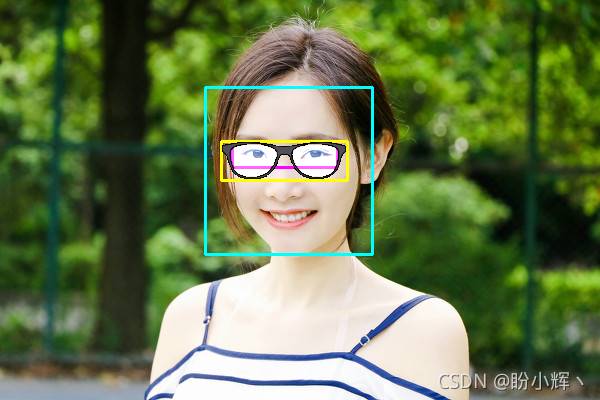
在这一实战程序中,我们将学习在检测到的面部眼睛区域上融合眼镜挂件。我们通过下图首次查看程序预期结果:
同样为了实现眼镜挂件融合,需要首先使用眼睛检测器检测图像中的眼睛:
eyepair_cascade= cv2.CascadeClassifier("haarcascade_mcs_eyepair_big.xml")
上图中青色矩形表示检测到的人脸在图像中的位置和大小;粉红色矩形表示图像中检测到的眼睛;黄色矩形表示眼镜将被覆盖的位置,其根据眼睛所在区域的位置和大小进行计算。
同时,为融合的眼镜眼镜挂件图像增加一些透明度,以使它们更逼真,眼镜图像蒙版如下所示:

融合后的结果图像如下图所示:

完整代码
基本代码与上例相同,因此不再进行赘述,需要注意的是“眼镜”挂件的融合区域计算。
import cv2
face_cascade = cv2.CascadeClassifier("haarcascade_frontalface_default.xml")
eyepair_cascade = cv2.CascadeClassifier("haarcascade_mcs_eyepair_big.xml")
img_glasses = cv2.imread('glasses.png', -1)
img_glasses_mask = img_glasses[:, :, 3]
img_glasses = img_glasses[:, :, 0:3]
video_capture = cv2.VideoCapture(0)
while True:
 ret, frame = video_capture.read()
 gray = cv2.cvtColor(frame, cv2.COLOR_BGR2GRAY)
 # 检测人脸
 faces = face_cascade.detectMultiScale(gray, 1.3, 5)
 for (x, y, w, h) in faces:
  roi_gray = gray[y:y + h, x:x + w]
  roi_color = frame[y:y + h, x:x + w]
  # 在检测到的人脸中检测眼睛
  eyepairs = eyepair_cascade.detectMultiScale(roi_gray)
  for (ex, ey, ew, eh) in eyepairs:
# 计算“眼睛”挂件放置的坐标
x1 = int(ex - ew / 10)
x2 = int((ex + ew) + ew / 10)
y1 = int(ey)
y2 = int(ey + eh + eh / 2)
if x1 < 0 or x2 < 0 or x2 > w or y2 > h:
 continue
# 计算“眼睛”挂件放置区域大小
img_glasses_res_width = int(x2 - x1)
img_glasses_res_height = int(y2 - y1)

mask = cv2.resize(img_glasses_mask, (img_glasses_res_width, img_glasses_res_height))
mask_inv = cv2.bitwise_not(mask)
img = cv2.resize(img_glasses, (img_glasses_res_width, img_glasses_res_height))
roi = roi_color[y1:y2, x1:x2]
roi_bakground = cv2.bitwise_and(roi, roi, mask=mask_inv)
roi_foreground = cv2.bitwise_and(img, img, mask=mask)
res = cv2.add(roi_bakground, roi_foreground):
roi_color[y1:y2, x1:x2] = res
break
 # 显示结果画面
 cv2.imshow('Snapchat-based OpenCV glasses filter', frame)
 if cv2.waitKey(1) & 0xFF == ord('q'):
  break
video_capture.release()
cv2.destroyAllWindows()
以上就是Python实战之基于OpenCV的美颜挂件制作的详细内容,更多关于Python OpenCV的内容请关注本站其它相关文章!
版权声明:本站文章来源标注为YINGSOO的内容版权均为本站所有,欢迎引用、转载,请保持原文完整并注明来源及原文链接。禁止复制或仿造本网站,禁止在非www.yingsoo.com所属的服务器上建立镜像,否则将依法追究法律责任。本站部分内容来源于网友推荐、互联网收集整理而来,仅供学习参考,不代表本站立场,如有内容涉嫌侵权,请联系alex-e#qq.com处理。
 关注官方微信